

Besides sweaters, scarves and boots, there’s nothing more I look forward to when the leaves start to change than experimenting with some darker colors for my eyes and lips.
Lately, I’ve been really into browns and crimson reds (think Julia Roberts in My Best Friend’s Wedding).
There are a bunch of different ways you can play around with fall colored makeup, but I thought it might be fun to try a monochrome burgundy look!

Here’s what I used:
- Maybelline’s Dream Pure BB Cream in Light/Medium
- Pur Air Perfection CC Cushion Compact Foundation in Medium
- Maybelline’s Brow Drama Sculpting Brow Mascara in Blonde
- Urban Decay Naked 3 Palette (not pictured)
- NYX Jumbo Eye Pencil in Rust (#619)
- Doucce Liquid Deep Eye Liner
- Too Faced Better Than Sex Mascara (not pictured)
- Maybelline Color Sensational The Buffs Lipstick in Touch of Spice (#660)

To begin, I moisturized my face and applied a thin layer of primer. I’m a huge advocate of primer, it’s a life saver. Makeup goes on so much smoother and looks much more polished when you use a base primer. Also, it prevents your makeup from melting off your face!
 Then I applied Maybelline’s Dream Pure BB Cream in light/medium to my entire face, using it just like a lotion or sunscreen. This BB cream has 2% salicylic acid for acne treatment to help clear blemishes. But, if you don’t have any breakouts or are prone to dry skin make sure to put on primer or lotion first.
Once I had a nice, base skintone I used Pur’s Air Perfection Foundation on my cheeks, forehead, chin, and nose to make my skin look more polished! The finish is very natural looking and the formula is easy to blend. The foundation is set in a unusual sponge-like material you can either apply with the given applicator, your finger, or a foundation brush! I used my MAC foundation brush because it’s my favorite.
 Then I moved on to my eyebrows! You can do your eyebrows either before or after your eye shadow, but this time I started with Maybelline’s Brow Drama Sculpting Brow Mascara. The tinted gel is great because you can either use it on its own or as a setting gel after you’ve filled in your brows. I thought the Blonde color was great and the formula held the arches of my brows up nicely (my arches are usually where my eyebrows tend to drop when I apply brow product).
Next I put Strange from the Urban Decay Naked 3 palette over my entire lid to create an even base color. I also used Liar from the Naked 3 palette to further define my crease, but this step is completely optional!
 With the NYX Jumbo Eye Pencil, I lined the crease of my eye and the corner of my lashline so that it created what almost looks like a greater than sign (sorry to bring math into this tutorial!) I then blended the rust color into the middle of my eye. You can use a finger or a blending eye shadow brush for this. The lines of the shadow pencil can be pretty defined at first, depending on how you draw it on, so blend until you like how it looks! You can keep adding more of the shadow for a darker look or only do a sheer layer, whatever fits your style!
After blending on both eyes, it’s time to line the bottom of your eyes! You can either draw the pencil across the entire bottom lash line or stop somewhere along the way. I lined my entire lash line because I wanted a really smoky, red look. With the same blending brush you used before or with your pointer finger, blend the inner and outer corners of your eyes for a smoky effect.
Once the eye shadow is the way you like it, line the upper eye with a black liquid liner. I used Doucce Liquid Deep Eye Liner. I liked how dark and inky the liner came out, but had trouble creating a nice, clean line with the short felt tip. I like my winged liner to be perfect, so it took me a little more time than normal to achieve the look I wanted. But, give it a try and let me know if it works well for you!
After you add your mascara, you’re almost done with your look!

All that’s left is your lips! Whenever I’m applying a dark color to my lips I always make sure to take care of cracked lines or chapped parts of my lips first. Adding some primer will help the color go on smoother.
A little trick: If you don’t have a liner that matches Maybelline’s Touch of Spice lipstick (which I didn’t!), flip the lipstick upside down and use the pointed part of the lipstick to line your lips! This helps keep the color within the lines you create.
Touch of Spice is beautiful but I wanted to really play up my lips, so I used the NYX Eye Shadow Stick from before and put the color on the lining of my lips and the inner part of the middle of my bottom lip! This gave me a smoky eye & lip!
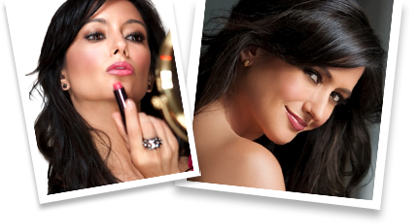
Here’s what they look like together:


And that’s it! You have a fall, monochrome smoky look you can wear during the day with an oversize sweater and combat boots or a DIVA look for a night out!
For a less intense look, you can also do a simple winged eyeliner and use the lipstick combo for a pop of color! Check this look out on my friend Adriana!

If you’re not usually one to wear darker colors on your lips or eyes, I dare you to give it a try! I bet you’ll be surprised how much you’ll like it and how many compliments you’ll get!
Be bold!

Be brave!

#Happy #Fall #DIVAS <3
– Kelsey
Instagram: kaleiter
Twitter: @kelsey_leiter
Note: This post is not sponsored. All thoughts are unbiased and my own. All photos are my own. Samples were provided for review.